I just listened to a sermon based on the text in James 1 which says, "Consider it all joy , my brethren, when you encounter various trials, knowing that the testing of your faith produces endurance."
This is not the time in my life when choosing joy is an easy task. I think it sounds almost impossible. It is 1:00 am as I type this entry. I do so because this command weighs heavy on my heart. I have had to make some very serious and painful decisions in my day, but none as painful and difficult as the one I made today. I really wished for life to be different. I really wanted my children to grow up with a strong relationship with the Lord. However, life can take turns we are not always ready to take nor are we ready to handle them on our own strength.
Choosing joy in the midst of a storm is really the best option we have. After all, the verse doesn't assure us of an easy life, full of happiness with an occasional bad day here and there. No, it guarantees that we will have trials, hardships, disappointments. This is the reality of the life we live in a sinful fallen world. I have experienced hardship and suffering this past year in ways that I would absolutely never have chosen to go through. Sometimes I find myself asking God for a reason I have to wait so long for an answer to this particular prayer to be answered. Over and over again I am reminded that God answers every prayer, sometimes it is just not the way we thought.
Tonight I cried out to Jesus to protect my son, to heal his heart, to remind him of the relationship that Jesus is waiting to have with him. Crying out to Jesus is sometimes the only thing I can do, and believe me, he has heard me begging and pleading many times for healing and help for him.
In the cries, I am reminded to keep my eyes on the One who made the sun, moon, and stars and every living creature. Who knows the very number of hairs on my head and sees a tiny sparrow fall to the ground. I pray that memories of lessons learned about God's faithfulness and lovingkindness will be present in the mind of my child. To remember that we gave him back in dedication to the Lord and that he remains and forever will be in the care of the Creator of the universe.
Joy, choose it, knowing that in Christ all things are possible. Even the seemingly impossible situations that we find ourselves in.
Friday, November 30, 2018

Tuesday, October 23, 2018
Death, where is your sting?
This is a difficult writing that I am attempting. In fact, I thought the words would just flow, but they aren't. The thoughts in my head are coming from every different direction and I am struggling with being able to organize them into a meaningful writing. So, if this seems as though I am rambling, please excuse that. I want to make the message clear, but that really isn't my job. My job is to be obedient and write even when it isn't really sounding all eloquent and precise.
So, in light of that explanation and until further clarity of mind comes, this is what I have:
As I sit thinking about the sudden loss of a woman this past week, I keep hearing God telling me that he knew all along. He knew before the beginning of time that on Friday morning at around 11:30, someone would be turning left into the mall and that would be the end of life on this earth.
It is painful for us who remain to go through the loss of a loved one. It is especially difficult when there was no time to prepare for such a change. But really, God was preparing this all along. God gave the family a wonderful vacation in England this past year. They were together seeing things that will forever be in their mind's eye. Precious moments that I am sure at the time didn't seem as special as they do now. That was a precious gift.
We do have a blessed hope in knowing that this life is not the final chapter. In fact, in Christ, there is no final chapter. We have the hope of eternity when we put our faith in Jesus. When Jesus rose from the grave, he put death to death. In that, we have great hope of eternity with him.
So, in light of that explanation and until further clarity of mind comes, this is what I have:
As I sit thinking about the sudden loss of a woman this past week, I keep hearing God telling me that he knew all along. He knew before the beginning of time that on Friday morning at around 11:30, someone would be turning left into the mall and that would be the end of life on this earth.
It is painful for us who remain to go through the loss of a loved one. It is especially difficult when there was no time to prepare for such a change. But really, God was preparing this all along. God gave the family a wonderful vacation in England this past year. They were together seeing things that will forever be in their mind's eye. Precious moments that I am sure at the time didn't seem as special as they do now. That was a precious gift.
We do have a blessed hope in knowing that this life is not the final chapter. In fact, in Christ, there is no final chapter. We have the hope of eternity when we put our faith in Jesus. When Jesus rose from the grave, he put death to death. In that, we have great hope of eternity with him.
Saturday, August 25, 2018
Beyond Quilting
As you can see, a lot of my blog has been focused on this quilt that I am trying to complete. I have been at a standstill in the progress as of late due to just being down right busy with other 'stuff.'
Trying to add thoughts to this blog has taken a back seat to many of the the other things going on too. I can't even really tell you that I have accomplished a lot of other things while not quilting or blogging, but they must be out there.
The thoughts have been racing through my head about one subject that I feel I really need to get down on paper before I explode or implode, or both. It is really a metaphor that has been hanging over my head for weeks now. Today, I want to get it down in written form so I can move on.
Quilting has pretty much consumed me this year. If you have read my previous posts, you can clearly see that truth. I feel that consumption has been a catalyst for my writing.
As I have worked on my quilt, I have thought about the process and how it relates so closely to my life. When I start a square, it begins by looking at a piece of paper that makes really no sense all by itself.

As I work toward the goal of piecing together the block, even still, the small little pieces coming together look to make no sense at all. Sometimes I look at one fabric that goes in the piece and I wrinkle up my nose at how ugly the color is. I would never choose that one particular color in a quilt of my own making. I wonder why someone would like that ugly color?

I move on, adding piece by piece. I see form taking shape, I see colors complimenting each other, I stand corrected as to the value of that one particular color.

Progress is being made and eventually the square comes together in full form. I see how pretty that one square is, but one square will not a quilt make. The quilt is far from complete when one square is made. There are more, more piecing, more colors, more patterns and shapes, more pressing the pieces so that they lie in the right direction, etc.

My squares are so far from perfect. It is difficult to make the whole quilt work correctly without making adjustments to the size and shape of each square. Sometimes cutting away a bit here and a bit there and other times completely scrapping the whole square and starting over with more careful precision.
As I put the squares together, I realize how much this is like life. If I focus on the pattern as I see it and how alone it makes no sense, I would not be able to make the square. If I don't make the square, how will the quilt be made? So, I take a piece here and a piece there, following the instructions. Still, that close up view is still not clear. It is far from beautiful, the ugly color is still there. I think of my own life, how focusing on one small part can distract from the end product. Today (as in this year) I have had my world turned upside down. The place I have loved to go has become a living hell for me, I have no option but to keep going, but I am miserable. That is that color green, that frustration of the seams not being right, the ripping out and starting over. Other issues in life are trying. I have an adult child who needs parenting still, can I tell you, it is harder to parent an adult than a child? It is like finding out that if I put the fabric face up instead of face down, it doesn't look right. So, I begin again, or I just put the wrong piece aside and start over.
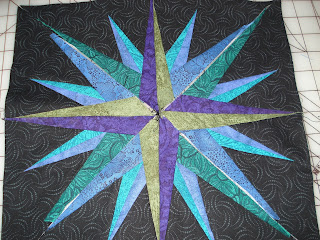
As I work continuously on my quilt, I also see other similarities in life. One particular square was just not looking good. I could do absolutely nothing to fix it. I tried making another one, same issue. So, in this case I reached out to a friend who spent time meticulously ironing out the square to make it work. Sometimes in life, we just need to really give it up, knowing we cannot fix the mess on our own strength. That friend came and used heat and water and forced that fabric to do what I needed. Had I refused that help, I would have a square that continued to look horrible. Just as she pressed and added heat and pressed, sometimes that is what I have to do with the mess I have made of my life. I have to surrender it over to a Master who can iron out the imperfections and give the forgiveness that my life needs.
So, as I continue, and I put the squares together, and I don't look up close, but pull away from the quilt, I can see the masterpiece it has become (well, not completely, because I am still not done with it). Look how life is like that. The circumstances we live in right now are the small pieces of our quilt. They make no sense in and of themselves. As we pull back, we see how God is using these things to put together our life. Much like my quilt, it isn't finished. I can however see that it is becoming more and more like what it is supposed to be. So, when trials come and our focus is on that one little piece, yes, we need to pay attention. But God is working all of it for the final masterpiece and we will pull back and see each area becomes a part of the whole and each trial builds character and we end up being a completed work of art that God had orchestrated in us.

Romans 8:28 says, And we know that in all things God works for the good of those who love him, who have been called according to his purpose. Keep that thought in mind while you work on the little pieces and the squares of the quilt we call Life.
Thanks for reading
Trying to add thoughts to this blog has taken a back seat to many of the the other things going on too. I can't even really tell you that I have accomplished a lot of other things while not quilting or blogging, but they must be out there.
The thoughts have been racing through my head about one subject that I feel I really need to get down on paper before I explode or implode, or both. It is really a metaphor that has been hanging over my head for weeks now. Today, I want to get it down in written form so I can move on.
Quilting has pretty much consumed me this year. If you have read my previous posts, you can clearly see that truth. I feel that consumption has been a catalyst for my writing.
As I have worked on my quilt, I have thought about the process and how it relates so closely to my life. When I start a square, it begins by looking at a piece of paper that makes really no sense all by itself.

As I work toward the goal of piecing together the block, even still, the small little pieces coming together look to make no sense at all. Sometimes I look at one fabric that goes in the piece and I wrinkle up my nose at how ugly the color is. I would never choose that one particular color in a quilt of my own making. I wonder why someone would like that ugly color?

I move on, adding piece by piece. I see form taking shape, I see colors complimenting each other, I stand corrected as to the value of that one particular color.

Progress is being made and eventually the square comes together in full form. I see how pretty that one square is, but one square will not a quilt make. The quilt is far from complete when one square is made. There are more, more piecing, more colors, more patterns and shapes, more pressing the pieces so that they lie in the right direction, etc.

My squares are so far from perfect. It is difficult to make the whole quilt work correctly without making adjustments to the size and shape of each square. Sometimes cutting away a bit here and a bit there and other times completely scrapping the whole square and starting over with more careful precision.
As I put the squares together, I realize how much this is like life. If I focus on the pattern as I see it and how alone it makes no sense, I would not be able to make the square. If I don't make the square, how will the quilt be made? So, I take a piece here and a piece there, following the instructions. Still, that close up view is still not clear. It is far from beautiful, the ugly color is still there. I think of my own life, how focusing on one small part can distract from the end product. Today (as in this year) I have had my world turned upside down. The place I have loved to go has become a living hell for me, I have no option but to keep going, but I am miserable. That is that color green, that frustration of the seams not being right, the ripping out and starting over. Other issues in life are trying. I have an adult child who needs parenting still, can I tell you, it is harder to parent an adult than a child? It is like finding out that if I put the fabric face up instead of face down, it doesn't look right. So, I begin again, or I just put the wrong piece aside and start over.

As I work continuously on my quilt, I also see other similarities in life. One particular square was just not looking good. I could do absolutely nothing to fix it. I tried making another one, same issue. So, in this case I reached out to a friend who spent time meticulously ironing out the square to make it work. Sometimes in life, we just need to really give it up, knowing we cannot fix the mess on our own strength. That friend came and used heat and water and forced that fabric to do what I needed. Had I refused that help, I would have a square that continued to look horrible. Just as she pressed and added heat and pressed, sometimes that is what I have to do with the mess I have made of my life. I have to surrender it over to a Master who can iron out the imperfections and give the forgiveness that my life needs.
So, as I continue, and I put the squares together, and I don't look up close, but pull away from the quilt, I can see the masterpiece it has become (well, not completely, because I am still not done with it). Look how life is like that. The circumstances we live in right now are the small pieces of our quilt. They make no sense in and of themselves. As we pull back, we see how God is using these things to put together our life. Much like my quilt, it isn't finished. I can however see that it is becoming more and more like what it is supposed to be. So, when trials come and our focus is on that one little piece, yes, we need to pay attention. But God is working all of it for the final masterpiece and we will pull back and see each area becomes a part of the whole and each trial builds character and we end up being a completed work of art that God had orchestrated in us.

Romans 8:28 says, And we know that in all things God works for the good of those who love him, who have been called according to his purpose. Keep that thought in mind while you work on the little pieces and the squares of the quilt we call Life.
Thanks for reading
Saturday, April 21, 2018
Quilt??? Who me???
I have a quilt kit that Jim bought me years ago, not even really sure how many. However, Jim has more confidence in my ability than he should and now, this many years later, I am attempting to make it.
I have made three squares so far. This is by far one of the most challenging projects I have done, I am not sure why someone (Jim) has so much confidence in me, he is clearly misguided. I have not tried to fool him all these years, I really am incompetent. He believes otherwise-this makes me love him and dislike him all the more.
So, after doing two practice runs on square number 3, I finally decided to put on my big girl panties and go for broke.
If you dare, you can follow along in the steps of paper piecing. I watched no less than 20 YouTube videos on how to paper piece, I thought about it when I was supposed to be doing other things, it consumed me. But, I believe I have a small glimmer of success.
Here are the steps.
 First we start with the paper, this kit has several options of making each block. I chose the paper piecing because I saw on the million videos that I watched how it makes such precise points. I wanted that (because I am so...sharp?).

 Second step, once I had my fabric cut to the measurements that the instructions said, was to arrange the fabrics so that I knew which one went to which. I struggle with being able to match things up and find I make a lot of mistakes by thinking I am doing something correctly and then finding I had made a huge mistake. I spend a lot of my life ripping out.
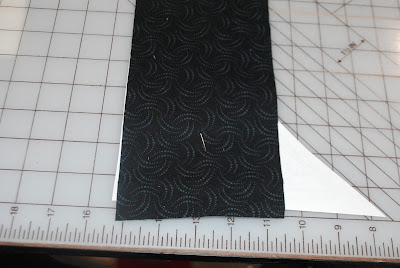
 Next, take the piece 2 and place it right side up on the fabric that you have right side down...right side to right side (finally, something that reminds me of normal sewing). Think in reverse when you line it up. The piece 2, when sewn in place will need to cover the area on the paper that is marked 2.
The line that you match up is the one between the area marked 1 and the area marked 2. (this picture you can see that line in on an angle at the left of the paper. The solid line is the one you sew on. Some of the videos I watch had arrows on those lines indicating which direction you would stitch them on your machine. This pattern doesn't specify that, and I went either direction, depending mostly on which way I had it in my hand when I got to the machine.
Next, take the piece 2 and place it right side up on the fabric that you have right side down...right side to right side (finally, something that reminds me of normal sewing). Think in reverse when you line it up. The piece 2, when sewn in place will need to cover the area on the paper that is marked 2.
The line that you match up is the one between the area marked 1 and the area marked 2. (this picture you can see that line in on an angle at the left of the paper. The solid line is the one you sew on. Some of the videos I watch had arrows on those lines indicating which direction you would stitch them on your machine. This pattern doesn't specify that, and I went either direction, depending mostly on which way I had it in my hand when I got to the machine.
 I folded back the paper to be sure I had the fabric close to but not off the line.
 Then, I pinned the fabric on that stitching line, that assures me that what I see next will be correct when I finish stitching.
 Here I "audition" the fabric before I bravely go the the machine. Hold the fabric up to the light and make sure that when you turn your seam, your number 2 area is completely covered with fabric. (this is where you make sure the bulk of your fabric is not in that area, because when you turn it, it will be).
 Now, the machine is used. Set your stitch length very small. I have a very old machine and it has no computer or brain that tells me the length of the stitches, only a dial that sets the length. I put it close to the smallest I can get. If you have a newer machine with a stitch length read out, they suggest 1-1.5 for your stitch length. The reason you want your stitches small is because it perforates the paper and makes it much easier to remove in the end. You sew right along the line between 1 and 2. Stay precisely on the line so that you get the crispness you are working for.
 Snip those pesky tails when you finish the seam. Oh, and back stitch at the start and end of the line.
 Turn you fabric and finger press it. If you are happy with it, as in, it covers that area it is supposed to cover, set it with the iron.
Now, the really tricky part that you have to stop and think before you do this. Some of the videos make this look so easy. It is easy, easy to mess up, easy to forget...easy!!!!
Take a piece of card stock or a thin ruler (have no idea where this one came from but it sure works great!). Place the straight edge on the line for area 3 and fold the paper over.
 Take your "Add a Quarter" ruler--see, I do need all the tools. Place the add-a-quarter on the edge of the folded paper and with a rotary cutter, cut off the remaining fabric that you will no longer need (save any larger pieces though, you never know when they may come in handy).
 I kind of eyeball piece three and make sure it is making sense to me. Then I turn the whole piece over and match up piece 3 to the edge that I just trimmed making sure to place it so that the whole area 3 will be covered once I sew it and turn it.


 I audition this one also, just to be really sure.
 And, I pin it along the line because I am really cutting it close with the match. (Had I known this was cut so close, I would have added just a touch to my pieces.)
 Back to the machine. I stitch along the solid line and remember to back stitch.
 Trim the tails.
 Finger press and then set with iron.
 Now, isn't that just what you thought it would be??? NO!!!
 There are several lines on the pattern. It helps to make sure you know what they are for. The dashes are where you cut, the solid is where you sew. So, now, we trim...be very careful not to cut the solid lines or you will start over.
 Line up your ruler on the dashed lines and cut away the excess fabric.
 Be very sure you are on the dash. As you can see here, I am not. I did that to show the line clearly. Trim away all three sides of your triangle.

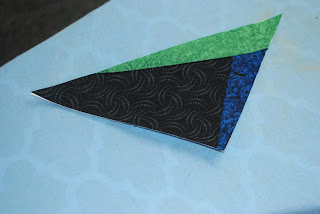 And here you have your first piece of completed paper piecing.
 Repeat for the four of the same.
 Then make the four of the other part of the block.
 Now, place them together according to the directions.
 Sew the quarters.
 Then the halves.
 And attach both halves to make a whole.

 You can hardly see it, but I put the border on the square. Because nothing is ever exact, despite my trying, I had to fudge the border a bit to make the block the correct finished size.
 Here are the ones I did for practice and then the finished one at the end. If at first you don't succeed,
 try again before you cut into your special fabric.
 I hope you enjoyed my tutorial.
I have made three squares so far. This is by far one of the most challenging projects I have done, I am not sure why someone (Jim) has so much confidence in me, he is clearly misguided. I have not tried to fool him all these years, I really am incompetent. He believes otherwise-this makes me love him and dislike him all the more.
So, after doing two practice runs on square number 3, I finally decided to put on my big girl panties and go for broke.
If you dare, you can follow along in the steps of paper piecing. I watched no less than 20 YouTube videos on how to paper piece, I thought about it when I was supposed to be doing other things, it consumed me. But, I believe I have a small glimmer of success.
Here are the steps.


 |
| You don't have to, but I stiffen my fabric just prior to sewing it together. I like how it works with it stiff. |
Step three is to join the pieces in order of the pattern. So, you start with number one, the foundation piece. Place the fabric right side down on your mat and place the paper on top of it. This is one of those sewing styles that you have to really think backwards on in order to make it end up correctly. Once you have your first piece down, you can add number 2. Some people suggest pinning the piece number 1 in place prior to adding piece 2. I didn't do this, but it is probably not a bad idea when starting out. It may keep you from making a mistake like I did on my 8th time...yes, the 8th one I messed up. I tell you, the struggle is real.

 Next, take the piece 2 and place it right side up on the fabric that you have right side down...right side to right side (finally, something that reminds me of normal sewing). Think in reverse when you line it up. The piece 2, when sewn in place will need to cover the area on the paper that is marked 2.

 |
| Make sure this fabric when the seam is opened will cover the area 2. |


Now, the really tricky part that you have to stop and think before you do this. Some of the videos make this look so easy. It is easy, easy to mess up, easy to forget...easy!!!!
Take a piece of card stock or a thin ruler (have no idea where this one came from but it sure works great!). Place the straight edge on the line for area 3 and fold the paper over.


Saturday, February 10, 2018
Nassau and Paradise Island
We were able to get off the boat again on Day 3. this was our long day on shore, we pulled in about 9 am and were going to be "parked" until 11pm. So, we had plenty of time to get some sightseeing in.

There were no scheduled excursions for us, our plan was to "wing" it. We set out to head to Nassau just to see what we could find.


We found "Captain Kirk" who promised to show us some good spots in the city and to take us over to Paradise Island to see the Atlantis.

Our first stop along the way was "Tasty Teas" where we were met by Sasha, she is 86 years old and it was her birthday that day. She told us all about the teas they sold there and their medicinal properties. We bought some, we figured if she looked this good at 86, we needed her secret.


Our next stop was a beach. It was pretty empty and this is where I drew a line in the sand. I have wanted to do that for a long time and finally had my opportunity. I even took a picture to prove I could do it.


Moving on, we stopped at John Watlings Distillery. Our tour guide here was a young man, pretty sure he was less than 86. Probably 84. He said we could ask questions along the way and if he knew the answer he would tell us and if he didn't, he would make something up. That led to much skepticism about anything he told us. However, he did tell us that there was usually one cell phone a day that ended up in the well. This was a small operation but they offered a chance to purchase rum at the end of the tour.


Next stop was a t-shirt company. It was a store, not a market type shopping experience. There were some very nice ladies who worked here and we purchased a few things.
Along the route, Captain Kirk pointed out places of interest in Nassau. He had told us up front the tour was about 2 hours, so we went pretty quickly. He took us to areas of the city where the rich lived and to the poorer areas (probably never the poorest) and the in-between. There were two hospitals there in the city. One was a public hospital where you would wait to be seen for not less than 12 hours, unless it was an emergency. The other hospital, which took payment of either cash or insurance offered much quicker services.
He then took us up to Fort Fincastle and the Watertower. We just walked around the area. The fort was built to look like a ship. Near there was the Queen's Staircase. The history there was interesting. Slaves started building or digging the stairway and during the process the queen abolished slavery. The freed slaves returned to complete the job which ended up being 65 steps. When the queen died, her reign had been 64 years so the city paved over one of the step so that it matched the number of years of the reign of the queen. And that, is how I heard the story. If you look it up online, it may vary a bit.


From there, we headed over to Paradise Island which is where the famous Atlantis is. We spent about a half an hour in the hotel, long enough to go to the "restroom" and the casino and then walk around the outside back to the vehicle. Certainly saw how the other half lives. We crossed the "Sidney Poirtier" Bridge. He is of Bahamian descent (who knew?).


Captain Kirk returned us to the port and we headed back to the ship.


 This was the night we would see Plumb and Danny Gokey in concert. Kathy and I got in line while Renee and Leila went to dinner. I wanted front row seats and so we started waiting way sooner than we could if we did dinner. Here are some shots of the concert, I can't bring the sound from the concert to you, but it was pretty awesome.


There were no scheduled excursions for us, our plan was to "wing" it. We set out to head to Nassau just to see what we could find.


We found "Captain Kirk" who promised to show us some good spots in the city and to take us over to Paradise Island to see the Atlantis.

Our first stop along the way was "Tasty Teas" where we were met by Sasha, she is 86 years old and it was her birthday that day. She told us all about the teas they sold there and their medicinal properties. We bought some, we figured if she looked this good at 86, we needed her secret.


Our next stop was a beach. It was pretty empty and this is where I drew a line in the sand. I have wanted to do that for a long time and finally had my opportunity. I even took a picture to prove I could do it.


 |
| My line in the sand |
Moving on, we stopped at John Watlings Distillery. Our tour guide here was a young man, pretty sure he was less than 86. Probably 84. He said we could ask questions along the way and if he knew the answer he would tell us and if he didn't, he would make something up. That led to much skepticism about anything he told us. However, he did tell us that there was usually one cell phone a day that ended up in the well. This was a small operation but they offered a chance to purchase rum at the end of the tour.


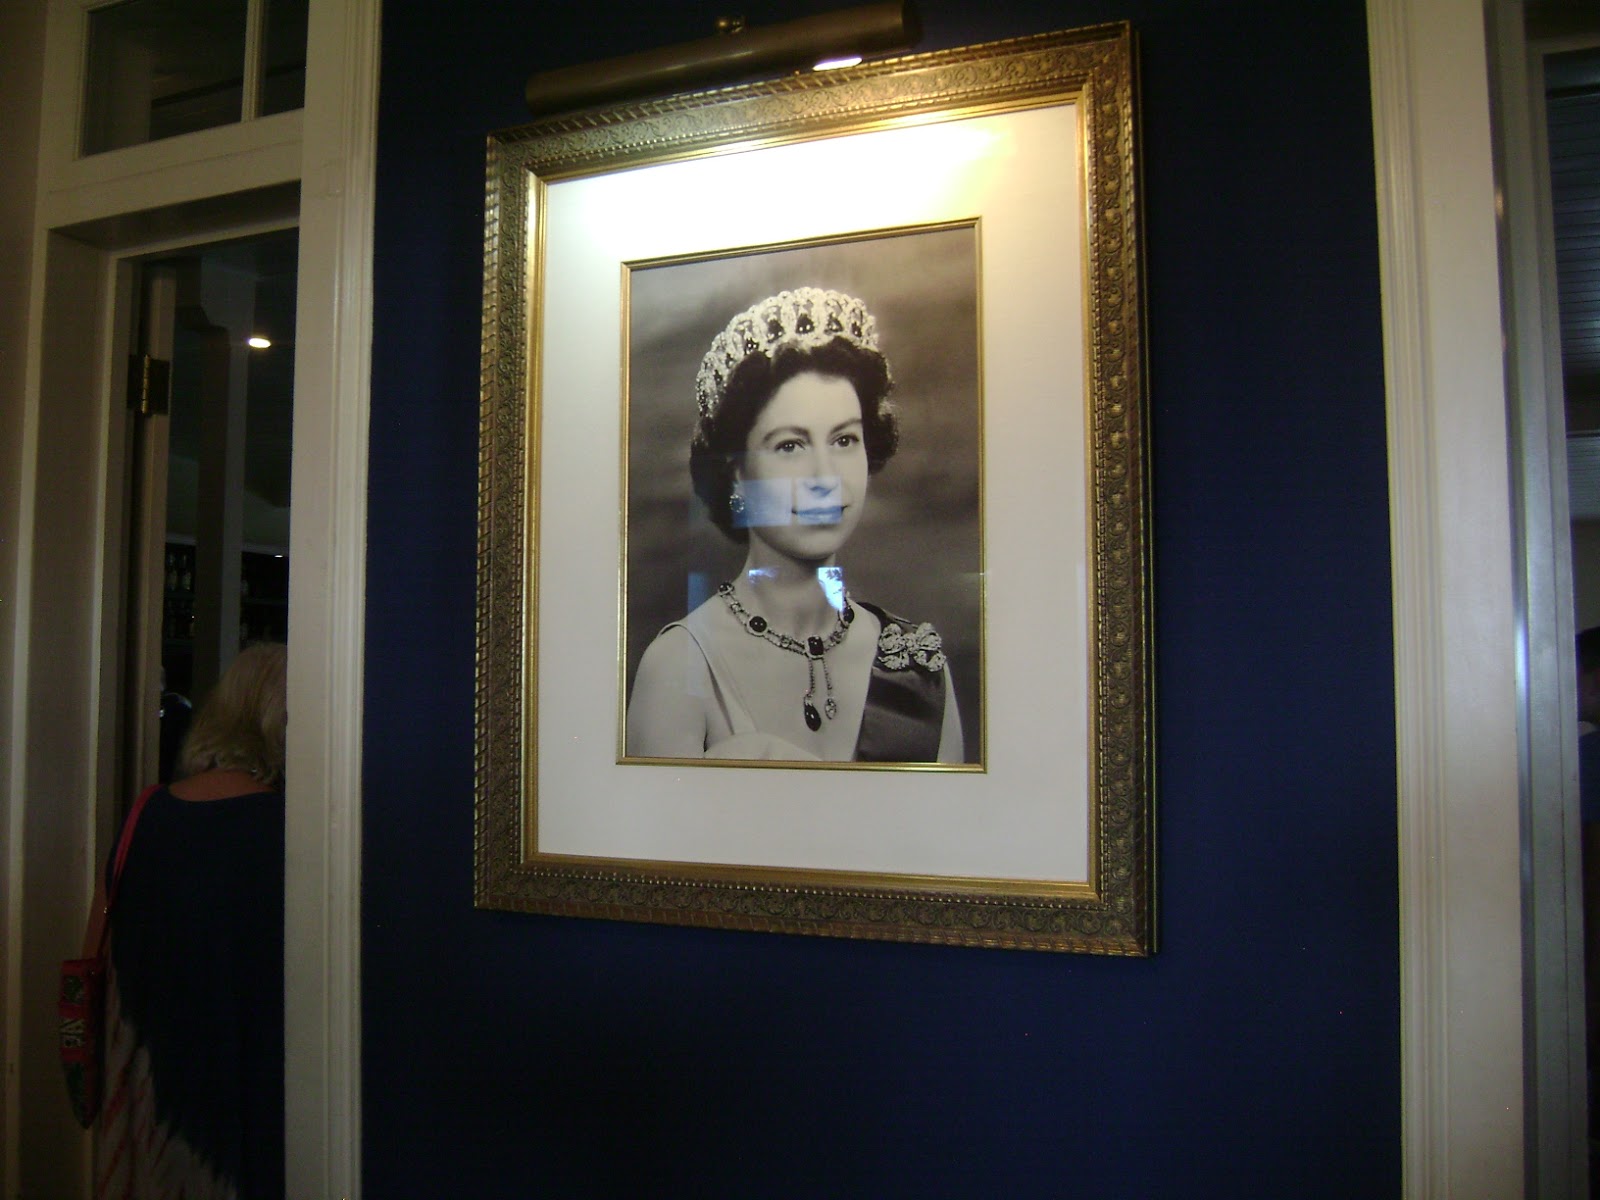

Next stop was a t-shirt company. It was a store, not a market type shopping experience. There were some very nice ladies who worked here and we purchased a few things.
Along the route, Captain Kirk pointed out places of interest in Nassau. He had told us up front the tour was about 2 hours, so we went pretty quickly. He took us to areas of the city where the rich lived and to the poorer areas (probably never the poorest) and the in-between. There were two hospitals there in the city. One was a public hospital where you would wait to be seen for not less than 12 hours, unless it was an emergency. The other hospital, which took payment of either cash or insurance offered much quicker services.
 |
| The Bahama Parliment |
He then took us up to Fort Fincastle and the Watertower. We just walked around the area. The fort was built to look like a ship. Near there was the Queen's Staircase. The history there was interesting. Slaves started building or digging the stairway and during the process the queen abolished slavery. The freed slaves returned to complete the job which ended up being 65 steps. When the queen died, her reign had been 64 years so the city paved over one of the step so that it matched the number of years of the reign of the queen. And that, is how I heard the story. If you look it up online, it may vary a bit.


 |
| Fort Fincastle |

From there, we headed over to Paradise Island which is where the famous Atlantis is. We spent about a half an hour in the hotel, long enough to go to the "restroom" and the casino and then walk around the outside back to the vehicle. Certainly saw how the other half lives. We crossed the "Sidney Poirtier" Bridge. He is of Bahamian descent (who knew?).


Captain Kirk returned us to the port and we headed back to the ship.


There was a paint session by Jared and then a concert on the pool deck that night. I will tell about those events on my next installment. You are probably tired of reading this by now anyway!!

Subscribe to:
Posts (Atom)
