I have made three squares so far. This is by far one of the most challenging projects I have done, I am not sure why someone (Jim) has so much confidence in me, he is clearly misguided. I have not tried to fool him all these years, I really am incompetent. He believes otherwise-this makes me love him and dislike him all the more.
So, after doing two practice runs on square number 3, I finally decided to put on my big girl panties and go for broke.
If you dare, you can follow along in the steps of paper piecing. I watched no less than 20 YouTube videos on how to paper piece, I thought about it when I was supposed to be doing other things, it consumed me. But, I believe I have a small glimmer of success.
Here are the steps.
First we start with the paper, this kit has several options of making each block. I chose the paper piecing because I saw on the million videos that I watched how it makes such precise points. I wanted that (because I am so...sharp?).
 |
| You don't have to, but I stiffen my fabric just prior to sewing it together. I like how it works with it stiff. |
Step three is to join the pieces in order of the pattern. So, you start with number one, the foundation piece. Place the fabric right side down on your mat and place the paper on top of it. This is one of those sewing styles that you have to really think backwards on in order to make it end up correctly. Once you have your first piece down, you can add number 2. Some people suggest pinning the piece number 1 in place prior to adding piece 2. I didn't do this, but it is probably not a bad idea when starting out. It may keep you from making a mistake like I did on my 8th time...yes, the 8th one I messed up. I tell you, the struggle is real.
 Next, take the piece 2 and place it right side up on the fabric that you have right side down...right side to right side (finally, something that reminds me of normal sewing). Think in reverse when you line it up. The piece 2, when sewn in place will need to cover the area on the paper that is marked 2.
 I folded back the paper to be sure I had the fabric close to but not off the line.
Then, I pinned the fabric on that stitching line, that assures me that what I see next will be correct when I finish stitching.
 |
| Make sure this fabric when the seam is opened will cover the area 2. |
Here I "audition" the fabric before I bravely go the the machine. Hold the fabric up to the light and make sure that when you turn your seam, your number 2 area is completely covered with fabric. (this is where you make sure the bulk of your fabric is not in that area, because when you turn it, it will be).
Now, the machine is used. Set your stitch length very small. I have a very old machine and it has no computer or brain that tells me the length of the stitches, only a dial that sets the length. I put it close to the smallest I can get. If you have a newer machine with a stitch length read out, they suggest 1-1.5 for your stitch length. The reason you want your stitches small is because it perforates the paper and makes it much easier to remove in the end. You sew right along the line between 1 and 2. Stay precisely on the line so that you get the crispness you are working for.
Snip those pesky tails when you finish the seam. Oh, and back stitch at the start and end of the line.
Turn you fabric and finger press it. If you are happy with it, as in, it covers that area it is supposed to cover, set it with the iron.
Now, the really tricky part that you have to stop and think before you do this. Some of the videos make this look so easy. It is easy, easy to mess up, easy to forget...easy!!!!
Take a piece of card stock or a thin ruler (have no idea where this one came from but it sure works great!). Place the straight edge on the line for area 3 and fold the paper over.
Take your "Add a Quarter" ruler--see, I do need all the tools. Place the add-a-quarter on the edge of the folded paper and with a rotary cutter, cut off the remaining fabric that you will no longer need (save any larger pieces though, you never know when they may come in handy).
I kind of eyeball piece three and make sure it is making sense to me. Then I turn the whole piece over and match up piece 3 to the edge that I just trimmed making sure to place it so that the whole area 3 will be covered once I sew it and turn it.
I audition this one also, just to be really sure.
And, I pin it along the line because I am really cutting it close with the match. (Had I known this was cut so close, I would have added just a touch to my pieces.)
Back to the machine. I stitch along the solid line and remember to back stitch.
Trim the tails.
Finger press and then set with iron.
Now, isn't that just what you thought it would be??? NO!!!
There are several lines on the pattern. It helps to make sure you know what they are for. The dashes are where you cut, the solid is where you sew. So, now, we trim...be very careful not to cut the solid lines or you will start over.
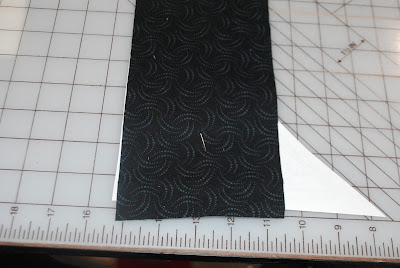
Line up your ruler on the dashed lines and cut away the excess fabric.
Be very sure you are on the dash. As you can see here, I am not. I did that to show the line clearly. Trim away all three sides of your triangle.
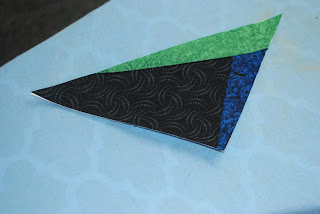
And here you have your first piece of completed paper piecing.
Repeat for the four of the same.
Then make the four of the other part of the block.
Now, place them together according to the directions.
Sew the quarters.
Then the halves.
And attach both halves to make a whole.
Here are the ones I did for practice and then the finished one at the end. If at first you don't succeed,
try again before you cut into your special fabric.
I hope you enjoyed my tutorial.


No comments:
Post a Comment